homemade water filter
There’s something oddly satisfying about solving everyday problems with your own two hands. Like fixing a leaky faucet with nothing but a wrench and a YouTube tutorial. Or whipping up a hearty meal from leftovers. Or — if you’re the resourceful type — figuring out how to make your own water filter at home.
Yeah, that’s right. A homemade water filter isn’t some off-grid survivalist gimmick. It’s a practical solution that’s helped folks all over the world get cleaner, better-tasting water using everyday materials. And honestly? It’s kind of fun.
So, whether you’re a camper, a parent tired of buying plastic water bottles, or someone just curious about filtering water DIY-style… let’s chat. No jargon, no pressure. Just good old-fashioned human talk about water, filters, and rolling up your sleeves.
Why Filter Your Own Water?
Truth is, even “clean” tap water can carry impurities. Sometimes it’s harmless — like sediment or minerals that give the water a weird taste. Other times, it’s bacteria, heavy metals, or chlorine that’s overstayed its welcome.
Of course, you can go out and buy a fancy filter pitcher or install a high-tech reverse osmosis system. But there’s something empowering about taking matters into your own hands. A well-built diy water filter can actually do a solid job of removing sediment and improving taste — and it’s way cheaper.
What You’ll Need (It’s Less Than You Think)
Let’s be clear. We’re not trying to build a NASA-grade filtration system here. We’re aiming for something practical and doable — something you could throw together with stuff lying around or a quick trip to the hardware store.
Here’s a basic lineup:
- A plastic bottle or food-grade bucket
- Activated charcoal (can be found in pet stores or online)
- Clean sand (fine and coarse)
- Gravel or small stones
- Coffee filter, cheesecloth, or cotton
- A rubber band or some tape
- Knife or scissors
That’s it. No lasers. No magic. Just good layering and gravity doing its thing.
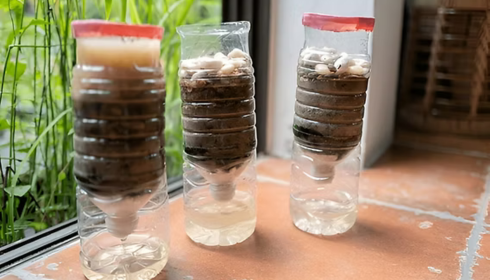
Building Your Filter: Layer by Layer
Start by cutting the bottom off your bottle or making a small hole in the bottom of your bucket. Flip the bottle upside-down so it’s like a funnel. Your filtering magic will happen inside this upside-down tower.
From bottom to top (remember, water will enter from the top and exit at the bottom):
- Cotton or cloth – This catches larger bits and prevents charcoal from escaping.
- Activated charcoal – This is your superstar. It removes chemicals, odors, and improves taste.
- Fine sand – Filters out finer particles and dirt.
- Coarse sand or gravel – Helps hold everything in place and filters larger particles.
- Rinse everything before assembly. You don’t want dust or muddy water.
Once assembled, pour water slowly through the top and collect it at the bottom. You might need to run the first batch or two through the filter a couple of times, especially if things look murky.
What It Actually Does (and Doesn’t Do)
Let’s keep it real — your home made water filter won’t remove viruses or dangerous chemicals like arsenic. This is mostly about filtering out visible dirt, improving clarity, and removing bad smells and tastes. Great for camping. Great for emergency kits. Great for understanding what’s in your water.
If you’re serious about long-term water safety at home, you’ll want to combine this with boiling, UV light, or additional treatment depending on your water source. But for everyday grit and funk? This method works surprisingly well.
Real-Life Scenarios Where This Helps
- Camping or hiking: Forgot your water tablets or filter straw? This setup could save your trip.
- Power outage or boil notice: When you’re told your water’s “safe to drink” but it smells like pool chemicals, this adds peace of mind.
- Curious kids: Want to teach them how water gets cleaned? A DIY filter is an amazing hands-on science project.
- Budget-conscious households: If a pitcher filter isn’t in the budget this month, this can get you through until it is.
Sometimes, it’s just about knowing you can. And that’s reason enough.
Tips, Tweaks, and Truths
- Always run a few batches of water through before using it for drinking.
- If you’re filtering water from a pond, boil it after filtering. Just to be safe.
- Activated charcoal is the key. Don’t skip it.
- Keep your filter clean and rebuild it every so often. This isn’t a “forever” device.
Also, don’t be afraid to tweak it. Some folks add crushed brick, others use ceramic components. It’s your filter — build it how you like.
Final Thoughts: More Than Just a Filter
A homemade water filter is more than a cool project. It’s a reminder that with a bit of knowledge and a touch of creativity, we can solve problems without always spending a fortune. It teaches patience, resourcefulness, and a whole lot about how water actually works.
In a world where we’re often overwhelmed by smart gadgets and subscription services, sometimes the smartest solution is the simplest one.